
Planners/Bullet Journal
I have read several articles or posts recently talking about how Bullet Journals are ineffective and take too much time and do not result in productivity. The complaint that a lot of people have is that a Bullet Journal requires you to make fancy layouts that need to be constantly redrawn, which takes a lot of time and is more artsy than productive.
A lot of people do put a lot of time into fancy artwork, templates, special markers, tabs, stickies, stickers, pockets, washi tape, covers, and constantly trying out the latest layouts on Pinterest… but that’s not what Bullet Journals are about. If that’s what turns your crank, that’s fine. Visual aesthetics and taking the time to craft something special is important and fulfilling to some people. But it isn’t what makes most people more productive.
Bullet Journal Principles
The idea behind Bullet Journals is that you can take any blank notebook (typically a Moleskin style perfect bound notebook, but any notebook at all) and you can jump right in and make task lists and other required plans and records in quick bullet form. Numbering the pages and keeping a Table of Contents in the front few pages helps you to quickly find what you need. Bullets can be turned into symbols to indicate your progress (open, completed, deferred, etc.)*
These are the principles behind the Bullet Journal and do not require any artwork, washi tape, coloured pens, calligraphy, or specially-crafted layouts.
I thought I would showcase my planner and how I use the Bullet Journal principles and adapt it to my needs.
Notebook style
Rather than using a bound notebook, I use a discbound planner with a combination of Rocketbook pages and conventional printed pages. Rather than having my pages in a random order with a Table of Contents in the front, I have tabbed sections for yearly, monthly, weekly, and daily records, and freeform notes and lists in the last section.
Rocketbook pages allow me to quickly digitize and store pages that I am finished with, and then wipe them clean, so that my planner does not need to contain anything but current records/upcoming plans. When I was using a paper planner, using two-page layouts for each month, week, and day of the year would take almost 500 pages. That is a full ream of paper. It’s heavy, even if you are only carrying a month with you at a time. My current planner is executive (half page) size and very light.
The discbound system, like a ringed binder, allows me to add, move, or remove pages as I please. I can add printed pages or move around Rocketbook pages.
Digital Calendar and Task List
It may surprise you that I keep both an analogue planner and digital calendars and task list. I reference 15 digital calendars and my task list is currently over 1,000 items long. Each new book starts with a template of tasks about 100 items long, and I am writing a new book each month. Some of those books are parts of collaborations that include a lot of other tasks that need to be completed, and various promos require templates that are 20 or 30 tasks long. I prefer to keep all of this in an electronic system where I can filter and set dates and reminders as necessary. Paper records of that length and complexity are difficult to manage.
My analogue planner does not contain all of my calendars and tasks. It is a planning system that helps me to break down my yearly plan into daily priorities so I can approach my day knowing I am focused on my goals.
So, without further ado, here is how I use my planner/Bullet Journal.
* The only symbols that I use regularly are bullets for tasks to be done, an X through the bullet if it is done, a > if it is deferred, a W if I am waiting for something before I can complete it, or a strike through if I have removed it from my list.
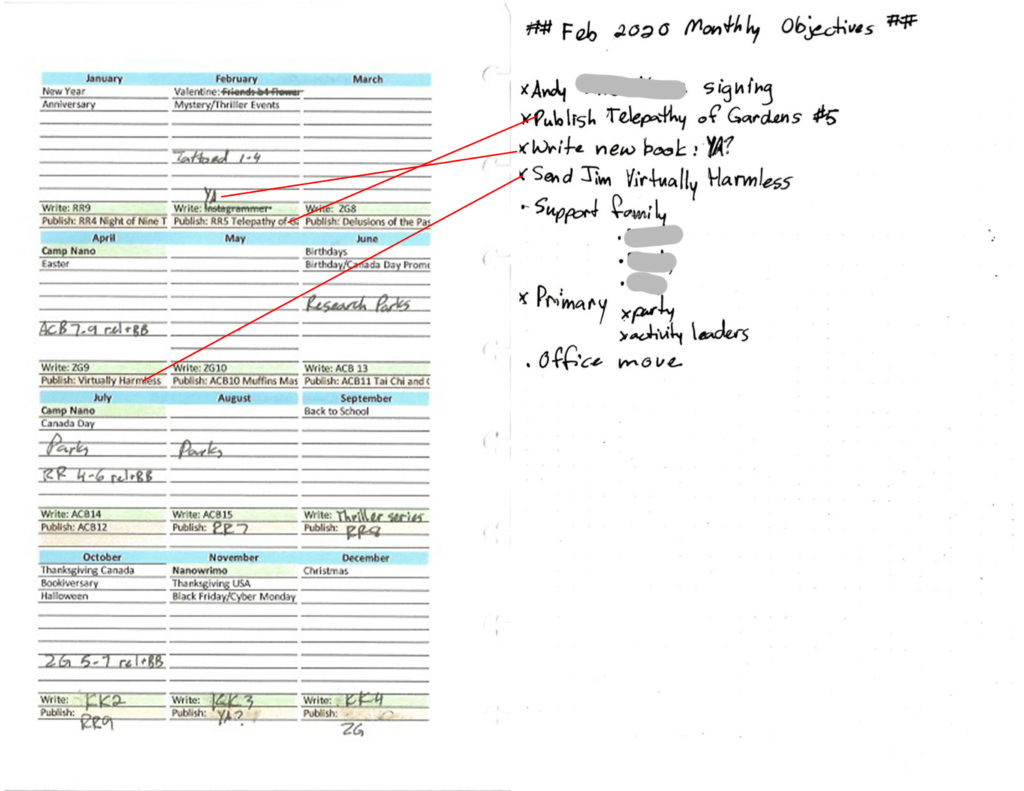
Year projects
As you can see, this is a very high level list of my publishing focus(es) for the year. During the last quarter of 2020, I’ll set up a page for 2021 and jot down my overall plans for 2021.
Year Overview
The Year Overview is a month-by-month breakdown of what I’m writing, what I’m publishing, ideas for promotional focuses, and other life events on one page. I print it at the beginning of the year, and write in changes as needed. If it gets too messy, I’ll update it on the computer and print it out again.
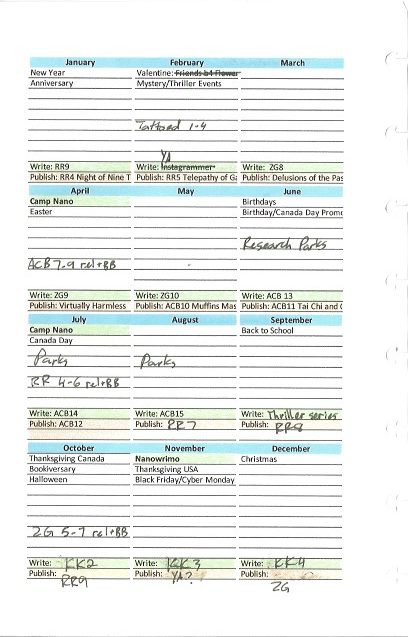
I also have a year-at-a-glance calendar showing all of the days of the months with local holidays and observances noted.
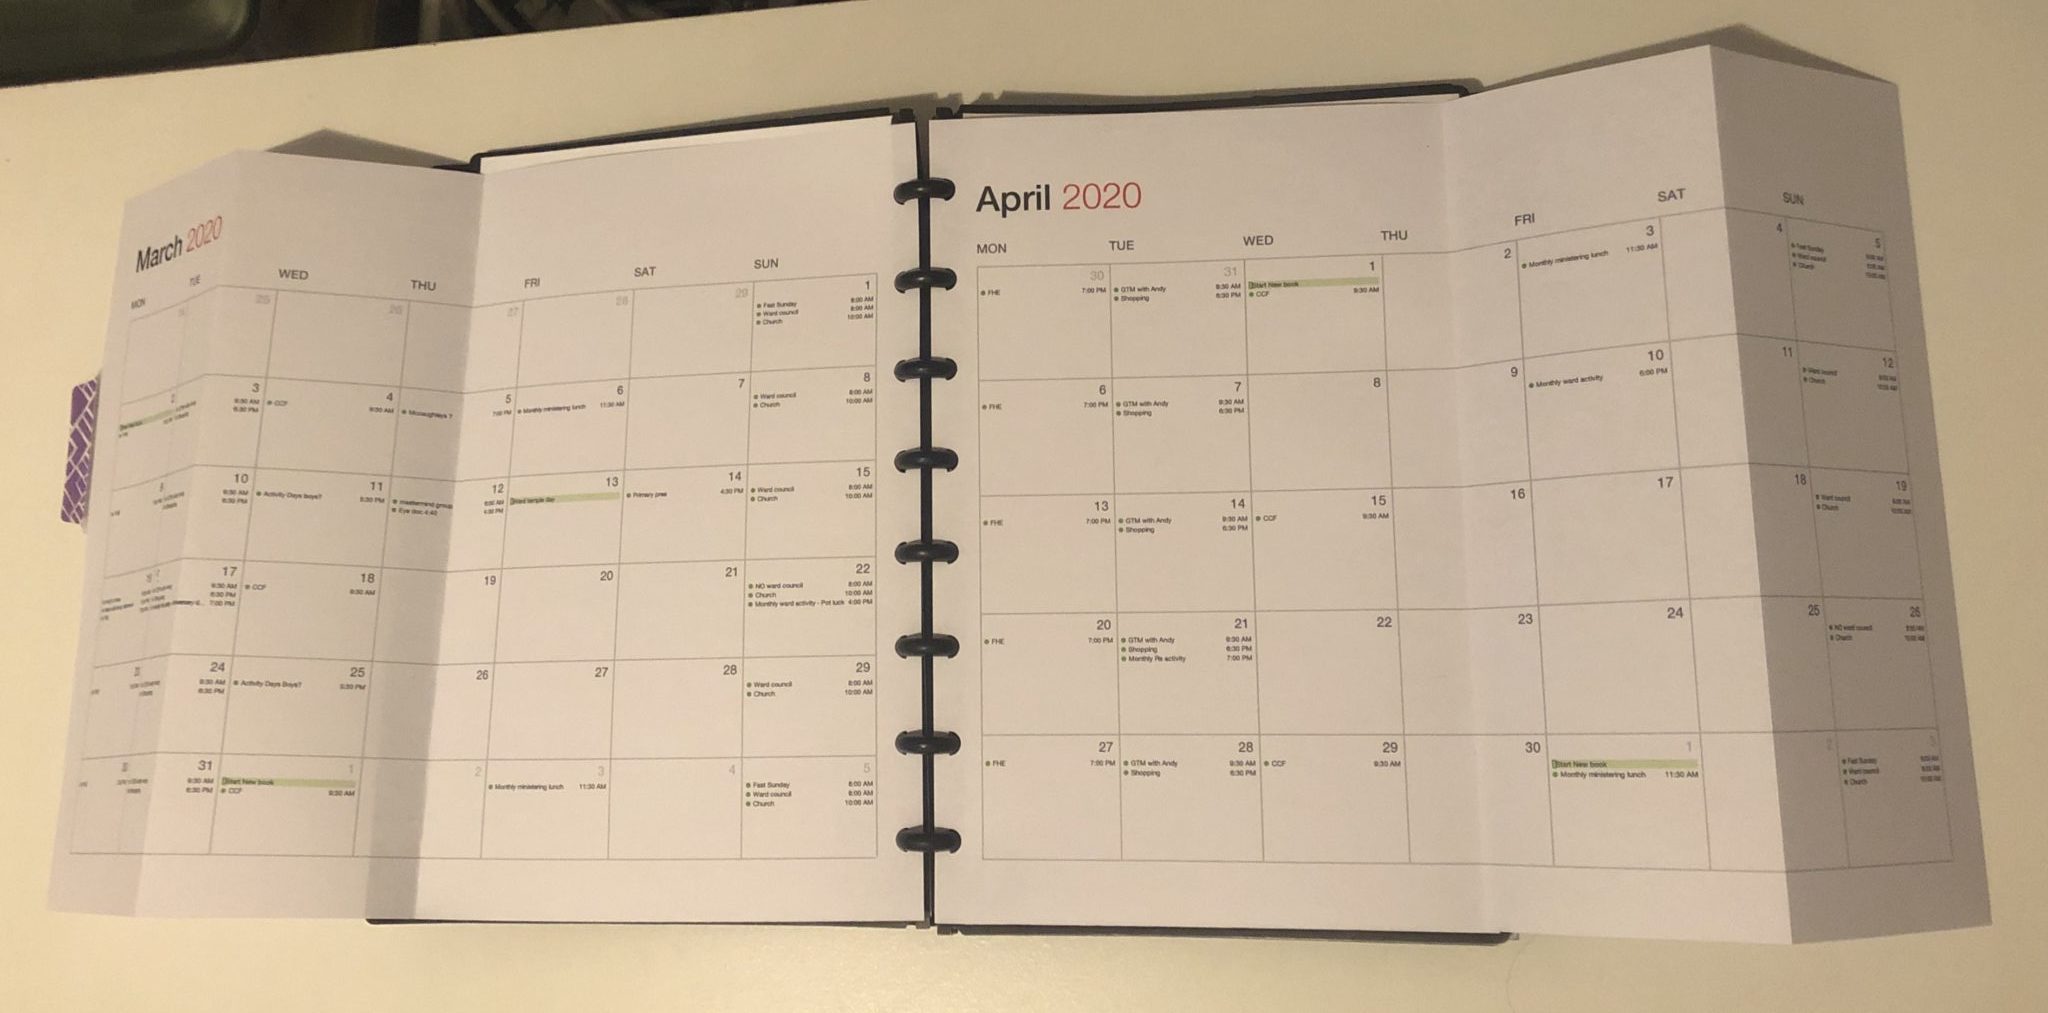
Month calendars
I have this month and next month printed on fold-out sheets so I can get a quick overview for the events of the month. On the computer, I have four calendars, another that shows my task feed, additional calendars for my son and my husband, nine for my boss’s schedule, and a couple others for church or other events. If I viewed them all at the same time it would be a huge mess, but they are set up in various views and combinations that work for me.
Only my main calendar gets printed for my planner. A high-level view. Nice big squares, plenty of space to scribble in if I want.
Monthly Objectives
The year overview feeds into my monthly objectives. I also add other roles, projects, or big goals that I need to do or be focused on for the month. No fancy templates, stickers, or artwork here. Just a bullet list. I have pages ready for the next few months so that I can add to it as it occurs to me that in <whatever month> I need to <remember to…>
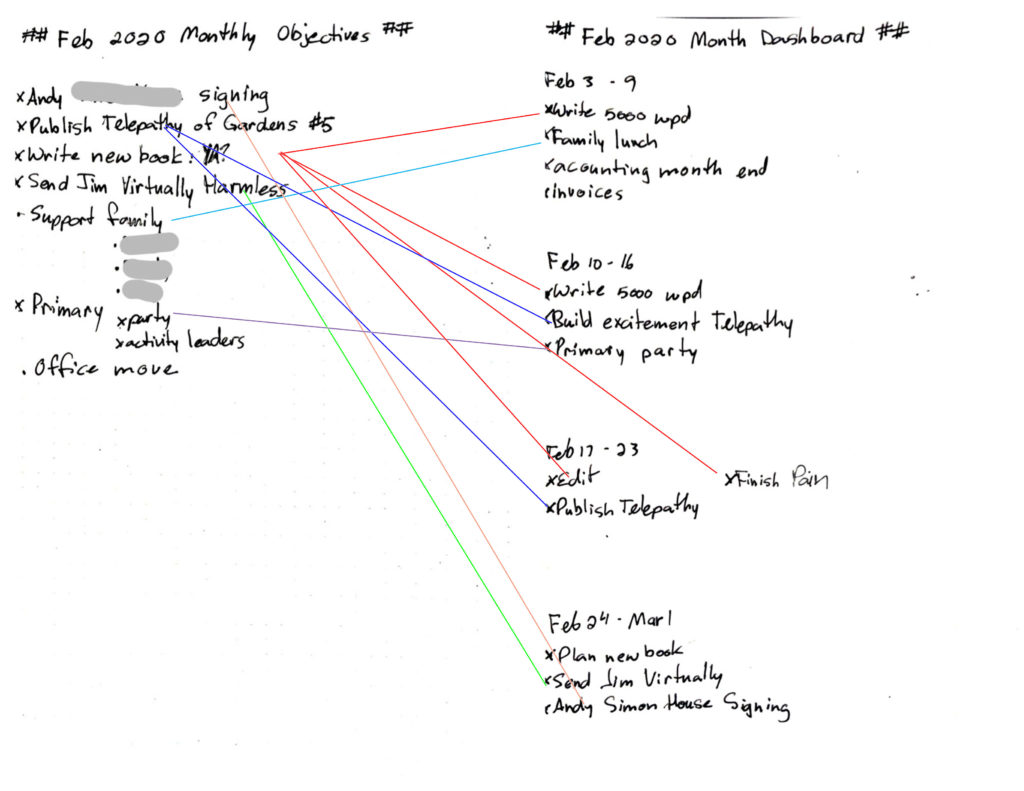
Month Dashboard
The monthly objectives then feed into my month dashboard. They are side-by-side in my planner. The month dashboard breaks the month down into weeks. I look at the monthly objectives, and figure out what needs to be done each week to get them done. I’ll also add in other things that I know need to be done that week so I can anticipate problems and keep things balanced.
Blog Posts and Cross Promo
I rough out blog posts and cross promotions and special events that I need to ask for newsletter swaps and shares on for each month. I draw from the year plan and jot down other ideas. I often check through lists of days/weeks/months of observance to see how they may fit with themes that I write about or particular books.
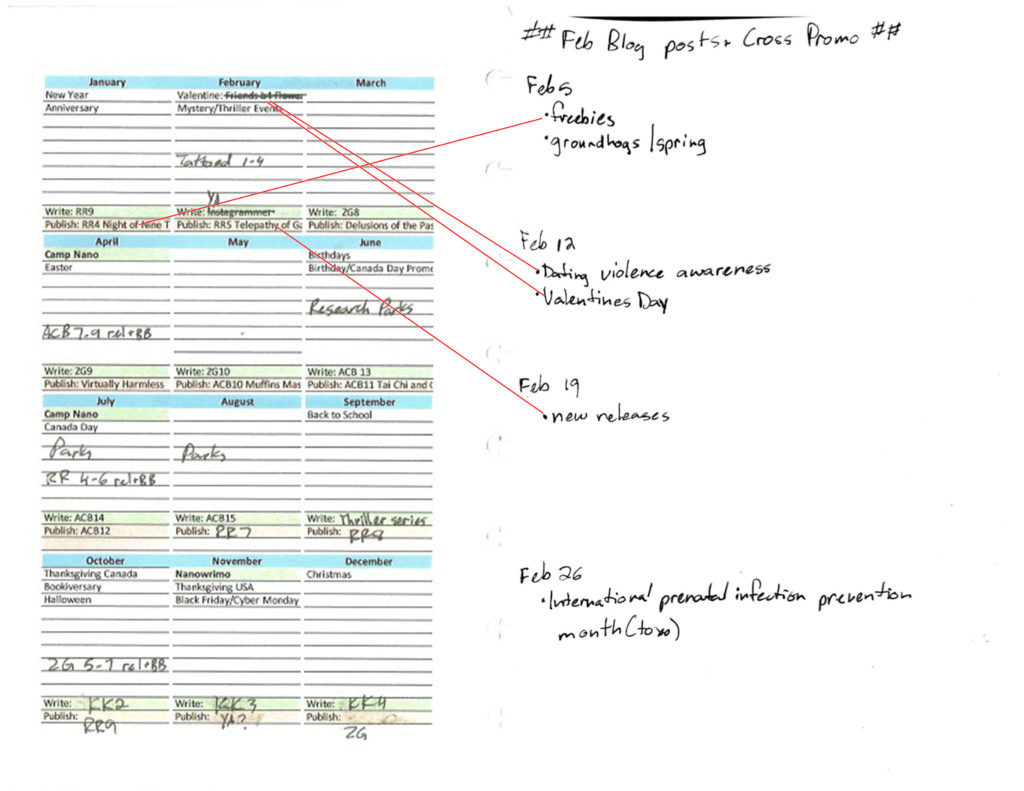
The blog posts that this list fed into were:
- Freebie weekend – Night of Nine Tails and more
- Teen Dating Violence Awareness
- The Telepathy of Gardens and other New Releases!
- International Prenatal Infection Prevention Month
I didn’t have any other big promotions going on that month that I needed to get other authors involved in. If I did, they would go here. In addition to these blogs, I also have a weekly Tuesday Teaser for the book I am reading, and other announcements, notices, awards, events, etc. as they come up.
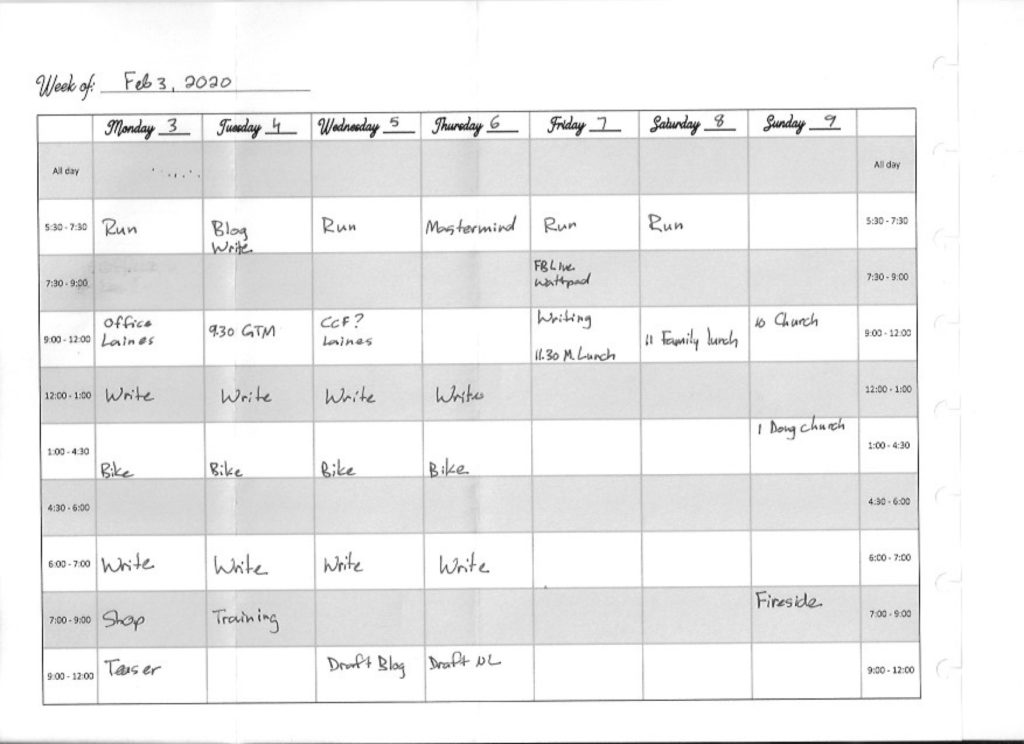
Weekly Schedule
For my weekly schedule, I use a printed template. I don’t draw it out every week. It is printed landscape on a letter size page and folds in accordion style to an executive size, so I can pull it out when necessary.
It is broken into the time blocks that my schedule operates on. It isn’t hourly. All of the blocks are the same size even though the number of hours vary. Writing out what I will be doing during the week allows me to block in my creative writing time, editing, blogging, exercise, office job, family time, etc. Looking at my schedule in this way each week allow me to spot conflicts between my schedule and my goals and to adjust for them.
Yes, all of my calendars start with Monday. I do my weekly planning on Sunday, and when I started my Weekly Schedule with Sunday, there was always a disconnect with not planning Sundays until it was too late, because Sunday had already happened by the time I did my planning and the next Sunday didn’t show up on my Weekly Schedule.
Week Dashboard
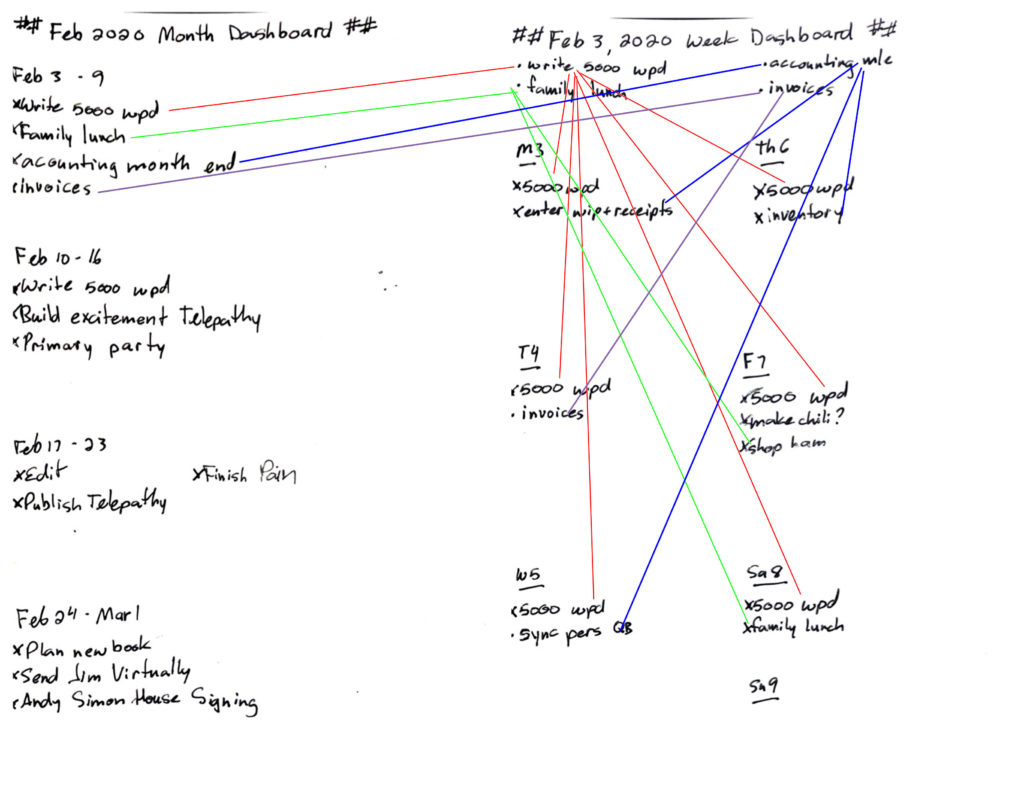
Since the Month Dashboard and the Week Dashboard do not sit side-by-side in my planner, the week objectives are transferred from the Month Dashboard to the top of the Week Dashboard. As I review the month dashboard and work through my electronic task list, I may add a few other things I need to work on that week as well.
Then the week objectives at the top are broken down and slotted into daily priorities. This looks like a pretty light week, but writing 5000 words per day, doing month end reports and billing, and preparing for an extended family get together (our rescheduled Christmas lunch) is nothing to sneeze at. Remember this is just the “big rocks,” the rest of my life/tasks will fill in around them, but the big rocks need to be placed first.
Daily Schedule
The Weekly Schedule feeds into the Daily Schedule (big surprise by now, I’m sure.) The Daily Schedule tends to include more detail and any additional items that have come up since I did my week planning. I refer to my electronic calendars as well as the written Weekly Schedule.
No gridlines or pre-set dates on the Daily Schedule. Just the day’s schedule with times on the left and a short description on the right. Some items are written in without times, indicating the rough order I intend to do them in, but no specific times requirement.

Daily Tasks
The Week Dashboard feeds into the Daily Task list. I also pull in high-priority items from my electronic tasks list or high-priority items that come up during the day. No grid/template here. Generally, I have writing/publishing tasks at the top, office job at the bottom, and family items, chores, errands, etc. in the middle. To me, it’s just like making piles on my desk. I don’t need gridlines and labels to show me where to put each pile. I just make lists, and keep them in the same general format each time.

So that’s the process. I begin with yearly focus and break everything down through the various stages until I reach the Daily Schedule and Daily Tasks, a two-page layout that stays in front of my face all day to keep me focused.
Great article! I appracite that you included pictures of your planner and how you use your lists of ideas, tasks, & goals differently.
I’m glad you found it useful! I wasn’t sure how helpful people would find it, but I often get asked how I plan my year, so I figured that rather than just saying “Bullet Journals don’t have to be fancy” I would map things out and show how it can work!